
Installing window film without bubbles can be tricky, but with the right approach, you’ll get professional-looking results. This guide is for DIY homeowners and first-time installers who want to avoid common mistakes that lead to unsightly air pockets and wrinkles.
We’ll walk you through the essential tools you’ll need for a smooth installation and the crucial surface preparation steps that make all the difference. You’ll also learn proven professional application techniques that prevent bubbles from forming in the first place, setting you up for a flawless finish every time.
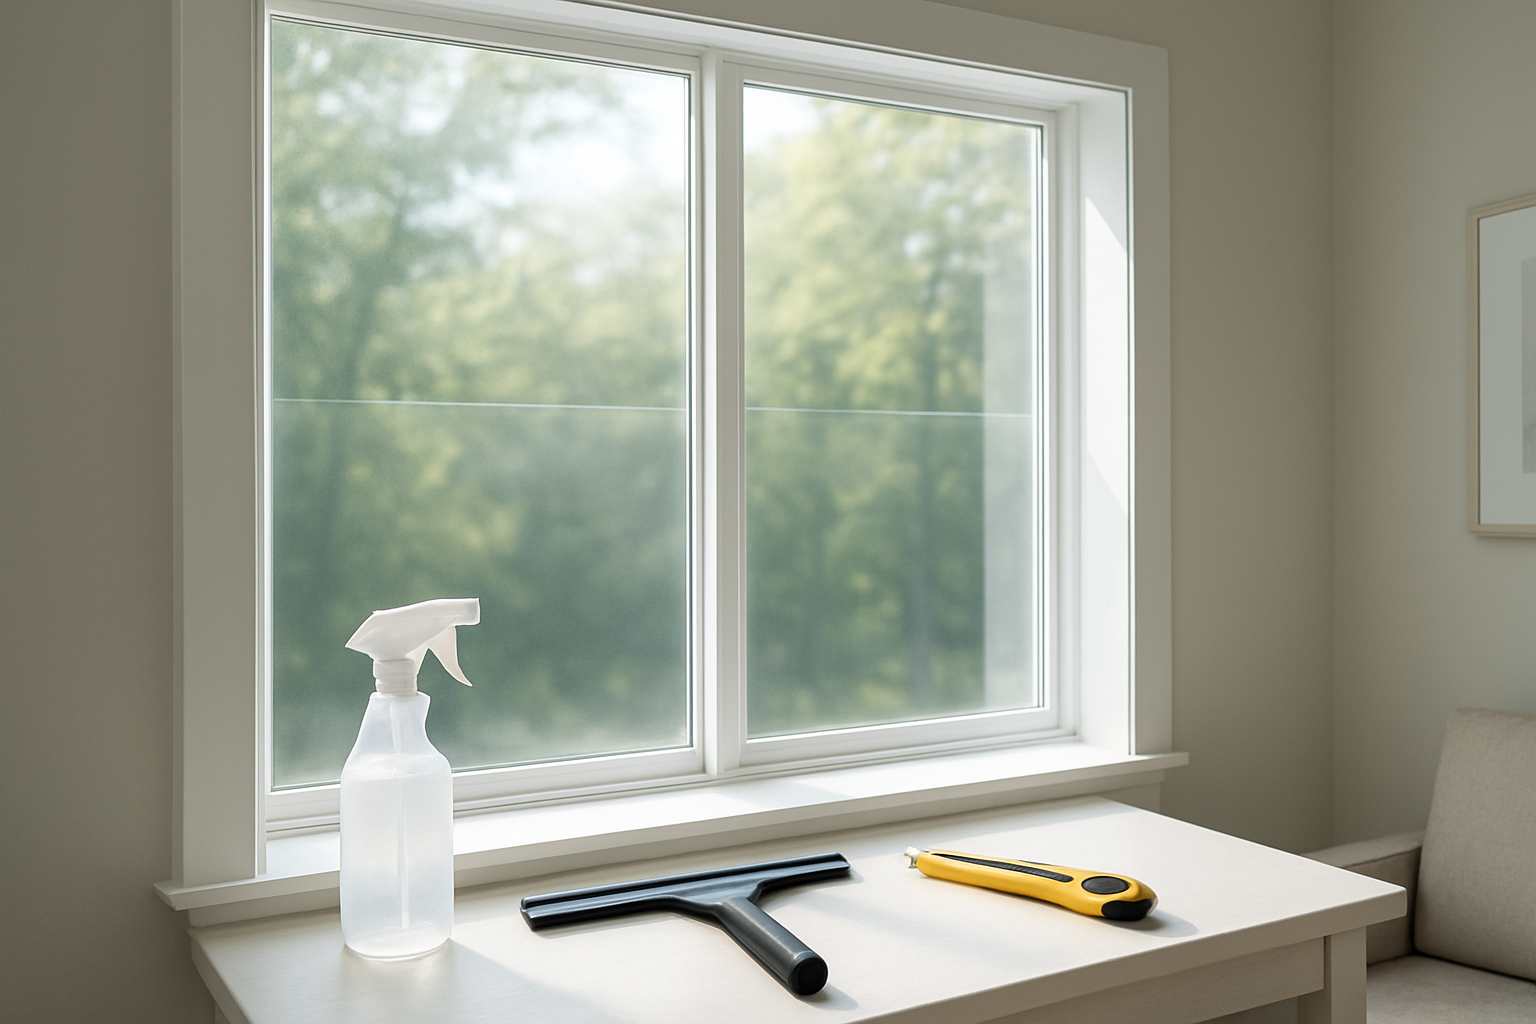
Essential Tools and Materials for Bubble-Free Installation

Professional-grade squeegees and application tools
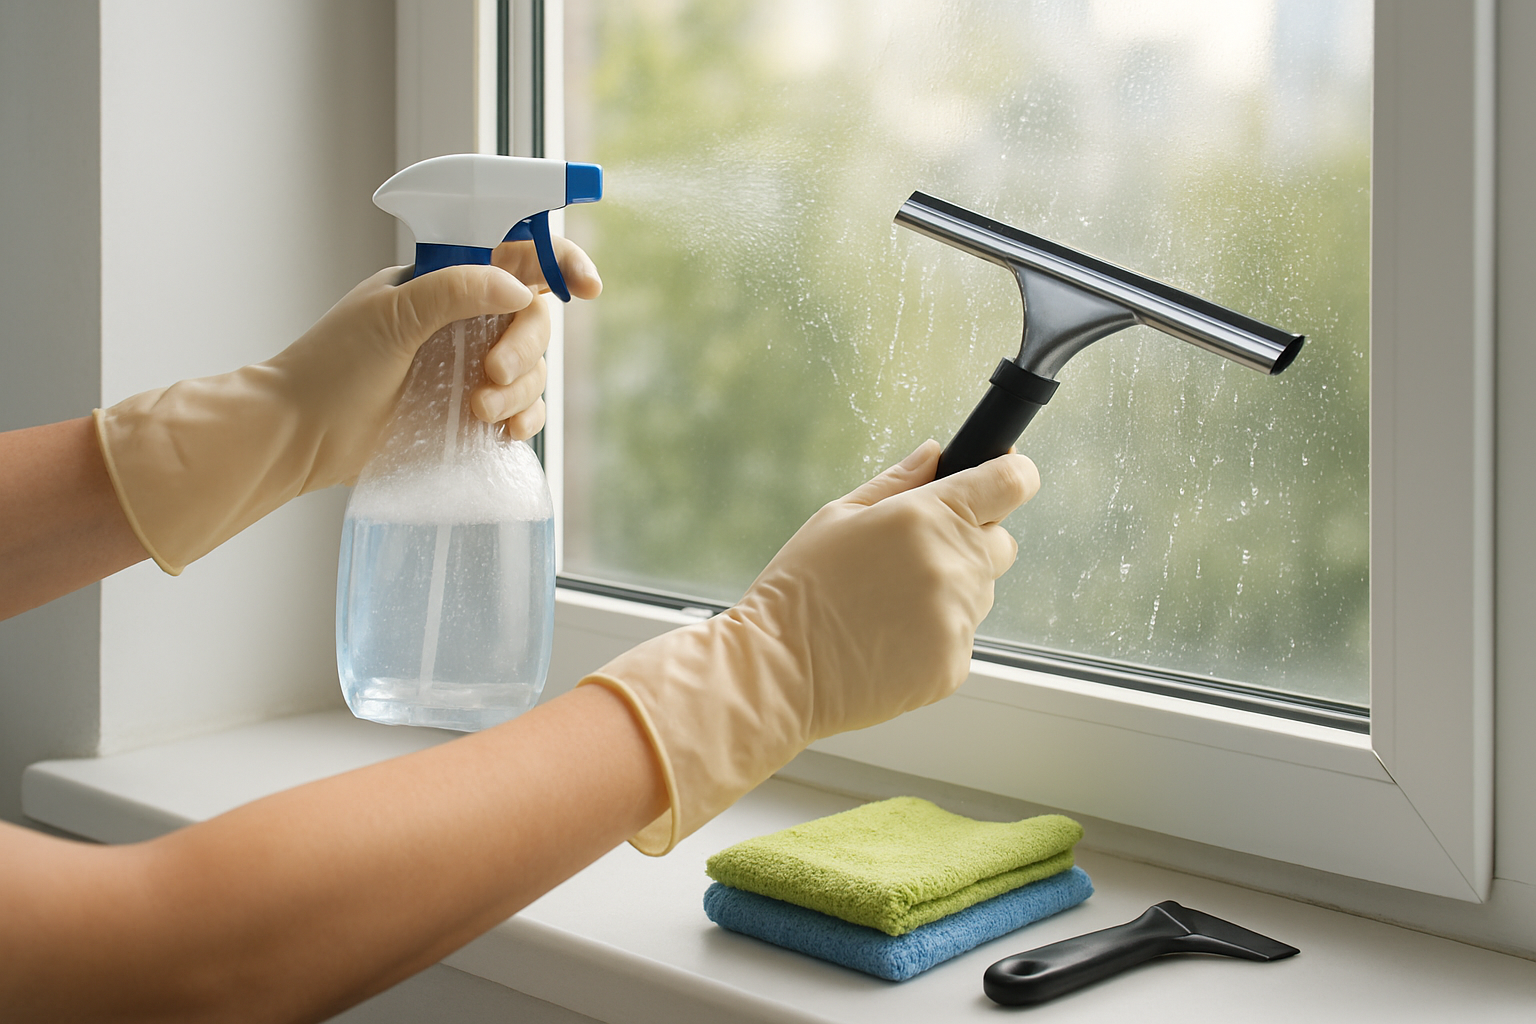
The foundation of any successful window film installation lies in having the right squeegee and application tools at your disposal. Professional-grade squeegees feature firm, flexible rubber blades that maintain consistent pressure across the film surface, ensuring smooth application without creating air pockets. Look for squeegees with comfortable ergonomic handles that provide excellent grip control during extended installation sessions.
Beyond the primary squeegee, specialized application tools make a significant difference in achieving professional results. A felt-edge squeegee serves as an invaluable finishing tool, allowing you to work delicate areas around window edges and corners without scratching the film. Heat guns or hair dryers become essential when working with shrink films or in cooler temperatures, helping the material conform better to glass surfaces and reducing the likelihood of bubble formation.
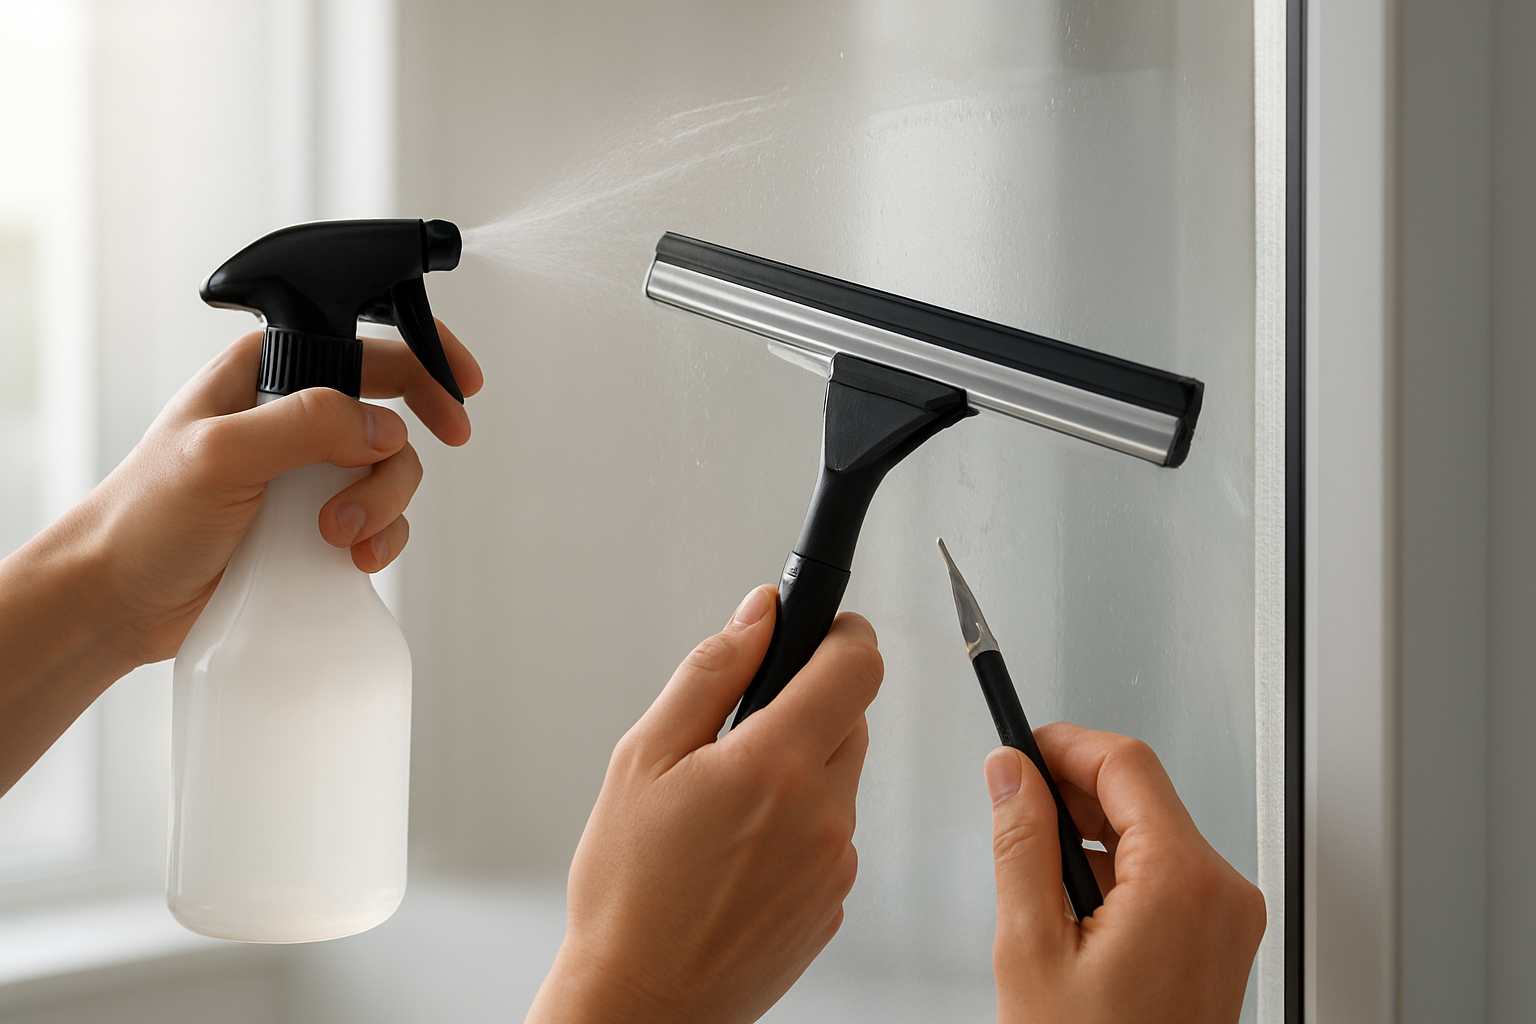
Sharp utility knife or razor blade for precise cutting
Precision cutting represents a critical aspect of bubble-free installation, making sharp cutting tools absolutely essential. A high-quality utility knife with fresh blades ensures clean, straight cuts that prevent film edges from lifting or creating entry points for air bubbles. Replace blades frequently throughout the installation process, as dull blades can tear the film or create ragged edges that compromise the final appearance.
For intricate cutting work around window hardware or decorative elements, single-edge razor blades offer superior maneuverability and control. Keep multiple blades readily available, changing them at the first sign of dulling to maintain cutting precision throughout the entire project.
Spray bottles for application solution
Proper application solution delivery requires reliable spray bottles that produce consistent, fine mist patterns. Professional installers typically use adjustable spray bottles that allow for varying spray patterns depending on the installation phase. During initial positioning, a wider spray pattern helps keep the film workable, while focused streams assist in specific area treatments.
The spray bottle’s trigger mechanism should provide smooth, consistent operation without clogging or irregular spray patterns that could interfere with the installation process. Consider having multiple bottles prepared with solution to avoid interruptions during critical installation phases.
Lint-free cloths and cleaning supplies
Surface preparation and ongoing cleaning during installation demand high-quality, lint-free cloths that won’t leave residue or fibers on the glass or film surface. Microfiber cloths excel at removing dust, fingerprints, and cleaning solution residue without scratching delicate film surfaces.
Complement your cloth selection with appropriate cleaning supplies designed specifically for window film installation. Avoid household cleaners that may contain ammonia or other chemicals that could damage the film adhesive or surface. Professional-grade cleaning solutions ensure optimal adhesion while maintaining the film’s clarity and longevity.
Pre-Installation Surface Preparation Techniques
Thorough window cleaning to remove dirt and residue
The foundation of a professional window film installation begins with meticulous surface preparation. Start by removing any loose debris, dust, and surface contaminants using a lint-free cloth or microfiber towel. Apply a high-quality glass cleaner or create a solution using distilled water with a few drops of dish soap to avoid mineral deposits that can interfere with film adhesion.
Work systematically from top to bottom, ensuring complete coverage of the entire glass surface. Pay special attention to corners and edges where dirt and grime typically accumulate. Use a squeegee to remove excess cleaning solution, followed by a final wipe with a clean, dry microfiber cloth to eliminate any remaining streaks or residue.
Inspecting glass for imperfections and damage
Before proceeding with installation, conduct a thorough examination of the glass surface under proper lighting conditions. Look for scratches, chips, cracks, or other imperfections that could compromise the film’s adhesion or create visible defects in the finished application.
Document any existing damage with photographs, as these areas may require special attention or could affect the film’s performance. Small scratches may be acceptable, but deeper gouges or chips should be professionally repaired before installation. Check for any etching or hard water stains that might not have been removed during cleaning, as these can create an uneven surface that leads to bubble formation.
Creating optimal temperature and humidity conditions
Environmental conditions play a crucial role in successful window film installation. The ideal temperature range for installation falls between 65-75°F (18-24°C), with relative humidity levels between 40-60%. These conditions ensure proper adhesive activation and allow sufficient working time for positioning and smoothing the film.
Avoid installation during extreme weather conditions, as high humidity can cause premature adhesive activation, while low humidity may prevent proper bonding. If working indoors, consider using climate control systems to maintain consistent conditions throughout the installation process. Temperature fluctuations during installation can cause the film to expand or contract, leading to wrinkles and bubbles.
Removing old film or adhesive residue completely
When replacing existing window film, complete removal of the old material is essential for optimal results. Begin by heating the existing film with a hair dryer or heat gun to soften the adhesive, making removal easier and reducing the risk of tearing.
Carefully peel the film starting from one corner, maintaining steady tension to remove it in large pieces rather than small fragments. Once the film is removed, address any remaining adhesive residue using specialized adhesive removers or a mixture of warm soapy water and ammonia. Allow the solution to penetrate the residue before gently scraping with a plastic razor blade held at a 45-degree angle.
After residue removal, perform a final cleaning with glass cleaner to ensure no traces of adhesive remover remain on the surface, as these chemicals can interfere with the new film’s adhesion properties.
Professional Application Methods for Perfect Results

Proper film positioning and alignment techniques
Now that we have covered the essential preparation steps, proper positioning forms the foundation of a professional window film installation. Begin by measuring your window accurately and cutting the film approximately 2 inches larger than the glass surface on all sides. This extra material provides adequate working space and prevents shortages during final positioning.
Position the film with the adhesive side facing the glass, using the slip solution to maintain workability. Align the film carefully along one edge first, typically starting with the top edge for vertical applications. Use your hands to hold the film in place while checking for square alignment with the window frame. The film should overlap evenly on all sides before you begin the permanent application process.
Create reference points using removable tape markers on the window frame to ensure consistent positioning throughout the installation. This technique proves especially valuable when working with larger windows where visual alignment becomes challenging.
Working air bubbles out systematically from center outward
Previously, many installers make the mistake of working bubbles randomly, which often pushes air into corners where removal becomes difficult. The systematic center-outward approach ensures complete bubble elimination and prevents trapped air pockets.
Start by locating the center point of your window film installation. Using your squeegee, apply firm pressure at the center and work outward in smooth, overlapping strokes. Follow a pattern that moves air toward the nearest edge, typically using horizontal strokes first, then vertical ones to catch any remaining bubbles.
Work in sections of approximately 12 inches at a time, ensuring complete air removal before moving to the next area. Pay special attention to corners and edges where air naturally tends to collect. If stubborn bubbles persist, lift the film slightly and reapply using additional slip solution to maintain workability.
Maintaining consistent pressure during application
With this in mind, next we’ll examine how consistent pressure application determines the quality of your final installation. Inconsistent pressure creates uneven adhesion patterns that appear as cloudy areas or water marks once the film cures completely.
Use a high-quality squeegee with a firm, comfortable grip to maintain steady pressure throughout the application process. Apply approximately 5-7 pounds of pressure consistently, which equates to firm hand pressure without excessive force that could damage the film surface.
Develop a steady rhythm during application, maintaining the same stroke speed and pressure intensity. Overlapping strokes should cover approximately one-third of the previous stroke width to ensure complete coverage without missing any areas. This systematic approach prevents pressure variations that create visible installation marks.
Trimming excess film with precision cuts
The final trimming stage requires precision and patience to achieve professional-looking edges. Use a sharp utility knife with a fresh blade, replacing it frequently to maintain clean cutting performance. Dull blades tear the film rather than cutting cleanly, creating rough edges that affect the installation’s appearance.
Leave approximately 1/8 inch gap between the film edge and window frame to allow for film shrinkage during the curing process. This small gap prevents the film from pulling away from edges as the adhesive fully bonds with the glass surface.
Make your cuts in single, smooth motions rather than sawing back and forth, which can create jagged edges. Hold the knife at a consistent angle and maintain steady pressure throughout each cut. For corners, use relief cuts to prevent film bunching and ensure flat, professional-looking edges.
Choosing the Right Window Film Type for Your Needs
Heat-control films for energy efficiency and UV protection
Heat-control films represent one of the most practical and cost-effective solutions for improving your home’s energy efficiency. These specialized films work by reflecting the sun’s heat away from your windows, significantly reducing overall heat gain throughout your living space. This thermal barrier effect makes your home feel noticeably cooler during hot summer months, which directly translates to reduced air conditioner usage and lower energy bills.
Beyond their energy-saving capabilities, heat-control films provide exceptional UV protection by blocking up to 99% of harmful ultraviolet rays. This protection is crucial for preserving your interior furnishings, hardwood floors, carpets, and artwork from the damaging effects of sun exposure that cause fading and deterioration over time. Some advanced heat-control films even offer dual-season benefits by reducing heat loss during winter months, providing year-round energy efficiency improvements.
Privacy films for security and light control options
Privacy films offer versatile solutions for maintaining confidentiality while controlling natural light levels in your space. Frosted films create a translucent barrier that allows ample light to pass through while effectively limiting visibility from both directions, making them ideal for bathrooms, conference rooms, or street-facing windows.
Mirrored films provide strategic daytime privacy by creating a one-way viewing effect – you can see out clearly while preventing outsiders from seeing into your home. These films are particularly effective during daylight hours when interior lighting is minimal. For maximum privacy control, black films offer comprehensive daytime privacy while simultaneously reducing the amount of light entering the room, creating a more controlled lighting environment.
All privacy film options provide additional benefits including UV ray protection that shields your furnishings and floors from sun damage, and many varieties also help limit solar heat gain for improved comfort.
Glare-control films for screen visibility improvement
Glare-control films specifically address the common problem of screen glare that affects television viewing and computer work comfort. These films significantly reduce harsh reflections and bright light interference, creating optimal conditions for digital screen visibility throughout the day.
The installation location is critical for glare-control films to perform effectively. For single-pane windows, these films should be applied to the interior surface, while dual-pane windows require exterior application for maximum glare reduction. Beyond improving screen visibility, glare-control films provide UV protection that prevents fading of furnishings, floors, and window treatments. Many formulations also incorporate heat-reducing properties that help minimize solar heat gain, contributing to overall indoor comfort.
Decorative films for aesthetic enhancement
Decorative films transform plain windows into attractive focal points through an extensive variety of patterns, textures, and colors. These films allow you to customize your windows’ appearance while maintaining the flow of natural light into your space, striking an ideal balance between aesthetics and functionality.
Unlike purely functional films, decorative options provide consistent privacy control that remains effective both day and night, regardless of interior lighting conditions. This makes them excellent choices for areas where continuous privacy is desired without sacrificing the bright, open feeling that natural light provides.
Advanced Bubble Prevention Strategies
Using Proper Application Solution Mixtures
The foundation of professional-grade bubble prevention lies in creating the optimal application solution. A properly mixed solution serves as both a lubricant and positioning aid, allowing the film to glide smoothly across the glass surface while providing adequate working time for adjustments. The key to achieving this balance involves understanding the precise ratios and components that create the ideal slip solution.
Temperature control of your application solution significantly impacts its effectiveness. Room temperature solutions provide the best balance of lubrication and evaporation rate, ensuring you have sufficient time to position the film without compromising adhesion quality. Cold solutions can slow down the installation process unnecessarily, while overly warm solutions may evaporate too quickly, reducing your working window.
Controlling Environmental Factors During Installation
Environmental conditions play a crucial role in determining installation success. Temperature fluctuations during application can cause the film material to expand or contract, leading to positioning difficulties and potential bubble formation. Maintaining a consistent temperature between 65-75°F creates optimal conditions for both film flexibility and adhesive performance.
Humidity levels require careful monitoring throughout the installation process. Excessive moisture in the air can interfere with proper adhesion and create condensation issues, while overly dry conditions may cause static buildup that attracts dust particles to the film surface. Ideal humidity ranges between 40-60% provide the best working conditions for professional-quality results.
Air circulation must be controlled to prevent dust contamination while avoiding excessive drafts that could disturb the film during positioning. Strategic use of air filtration and controlled ventilation ensures a clean working environment without creating disruptive air currents.
Working in Manageable Sections for Large Windows
Large window installations demand a systematic sectional approach to maintain quality standards throughout the entire surface area. Breaking down extensive glass surfaces into manageable segments prevents the application solution from drying prematurely and reduces the physical strain that can lead to installation errors.
Planning your sectional approach begins with analyzing the window dimensions and identifying natural division points. Vertical sections typically work best for tall windows, while horizontal divisions may be more appropriate for wide installations. Each section should be sized according to your skill level and the complexity of the window features.
Overlap management between sections requires precise technique to ensure seamless transitions. Proper planning of section boundaries and careful attention to edge alignment prevents visible seam lines and maintains the professional appearance of the finished installation.
Recognizing When to Reposition Versus Continue
Critical decision points arise during every installation where continuing forward or repositioning becomes necessary. Understanding these moments and making appropriate choices separates professional results from amateur attempts. Early recognition of positioning errors allows for correction before the adhesive begins to set permanently.
Timing considerations become paramount when evaluating repositioning options. The window of opportunity for major adjustments typically closes within the first few minutes of film contact with the glass surface. Beyond this point, attempting significant repositioning may damage the film or compromise adhesive integrity.
Assessment criteria for repositioning decisions should focus on the severity of the error and its potential impact on the final result. Minor imperfections may be workable, while major alignment issues require immediate correction to achieve professional standards.
Troubleshooting Common Installation Problems
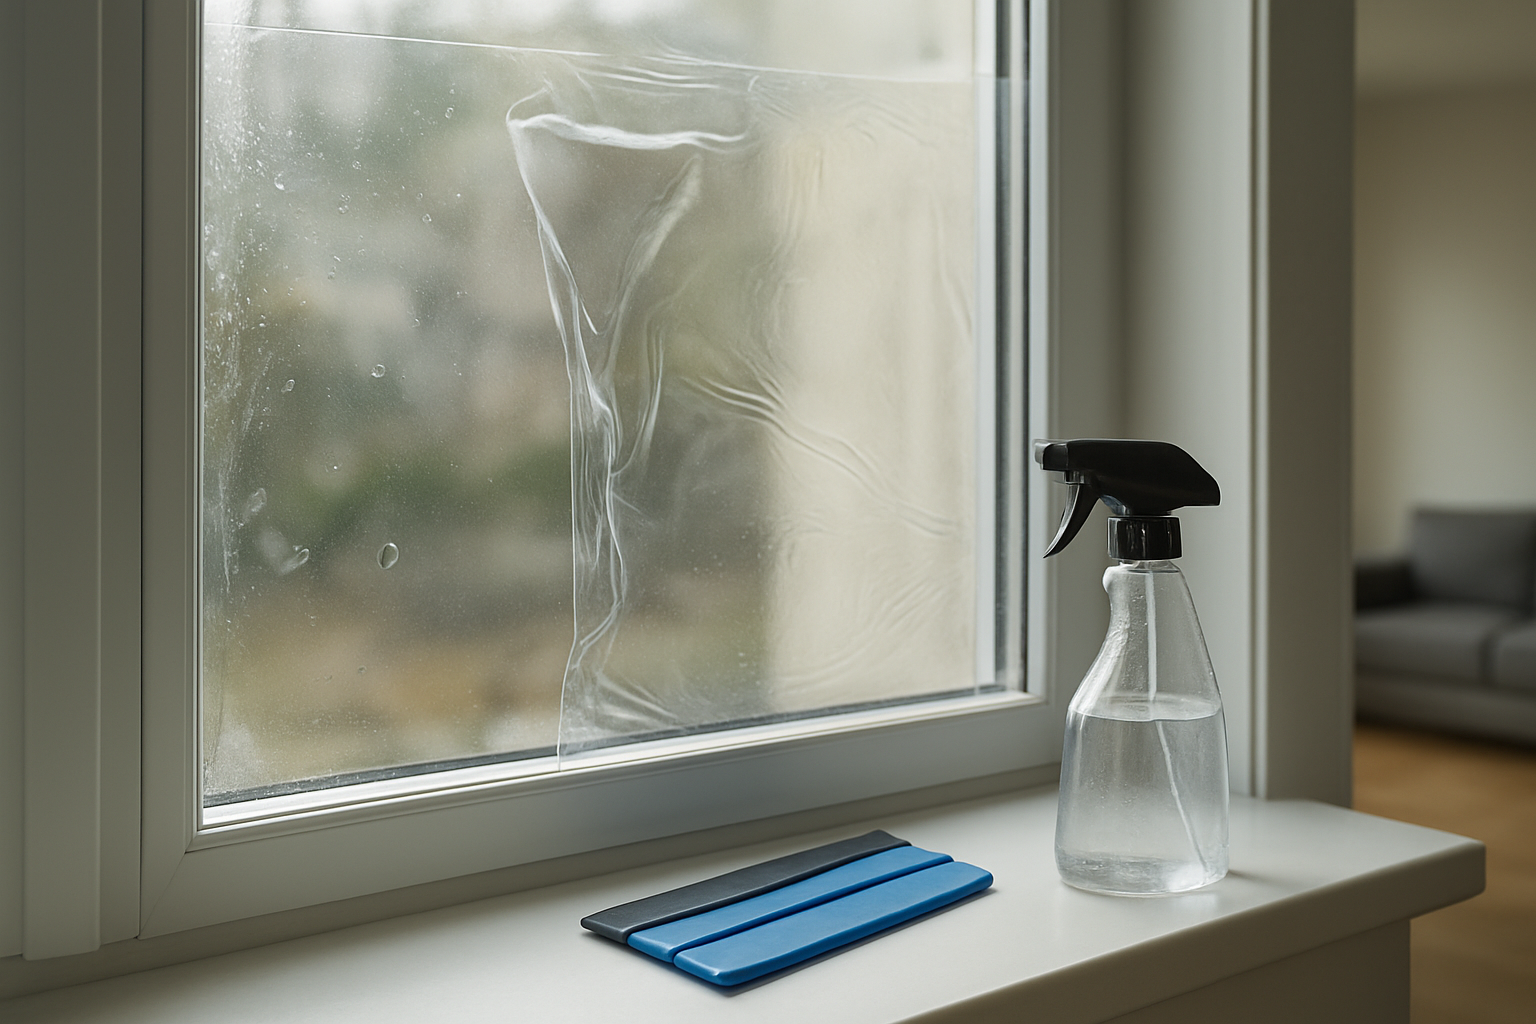
Removing stubborn air bubbles after application
Even with meticulous installation techniques, stubborn air bubbles can occasionally appear in window film applications. The key to successful bubble removal lies in addressing them while the adhesive is still workable, typically within the first 24-48 hours after installation.
For small bubbles under 1/4 inch, use a microfiber cloth or felt-edge squeegee to gently work the air toward the nearest edge. Apply steady, consistent pressure while moving in one direction to avoid creating new wrinkles. If bubbles persist, slightly lift the film edge and reapply with proper smoothing techniques.
Larger bubbles require more aggressive intervention. Create a small pinhole using a sterilized needle at the bubble’s center, then carefully squeeze the air out through this opening. The microscopic hole will typically seal itself as the adhesive cures.
Fixing wrinkles and creases in film
Wrinkles and creases represent one of the most challenging installation problems, often requiring partial film removal for proper correction. Temperature plays a crucial role in wrinkle repair – warming the film with a hair dryer on low heat makes it more pliable and easier to manipulate.
For minor wrinkles, carefully lift the affected section and reposition the film while applying consistent pressure. Work from the center of the wrinkle outward to redistribute the material evenly. Deep creases may require complete removal of the film section and reapplication with fresh solution.
Prevention remains the best strategy – ensure adequate slip solution coverage and work systematically from one side to the other during initial application.
Dealing with film that won’t adhere properly
Poor adhesion typically stems from contaminated surfaces, insufficient cleaning, or environmental factors. Temperature and humidity significantly impact adhesive performance – ideal conditions range between 65-75°F with moderate humidity levels.
If sections refuse to adhere, remove the film completely and restart the cleaning process. Use a degreasing solution followed by thorough rinsing and drying. Residual soap, oils, or cleaning products can create barriers preventing proper adhesion.
Check for surface irregularities such as scratches, pitting, or texture variations that might prevent full contact. In some cases, switching to a different film type with stronger adhesive properties may be necessary.
Correcting alignment and positioning errors
Alignment mistakes become apparent during the initial positioning phase and require immediate correction to avoid permanent installation problems. The key lies in maintaining adequate slip solution to allow repositioning without damaging the film.
For minor alignment issues, carefully lift one corner while keeping the rest of the film in place. Reposition gradually while ensuring the film remains properly lubricated. Major positioning errors may require complete removal and reapplication.
Use reference points such as window edges, mullions, or tape guides to maintain proper alignment throughout the process. Work with a helper for large installations to ensure consistent positioning and prevent stretching or distortion during adjustment.
Installing window film without bubbles is entirely achievable when you follow the right techniques and use proper tools. From selecting the appropriate film type for your specific needs to mastering professional application methods, each step in the process contributes to a flawless, bubble-free installation. The key lies in thorough surface preparation, using quality tools like squeegees and spray bottles, and employing advanced bubble prevention strategies such as proper wetting solutions and controlled application pressure.
With the troubleshooting techniques covered in this guide, you’re now equipped to handle common installation challenges and achieve professional-looking results. Remember that patience and attention to detail are your best allies in this process. Whether you’re installing heat-control, privacy, or decorative window film, these proven methods will help you transform your windows while avoiding the frustration of unsightly bubbles and imperfections.